Spring Data 란?
Spring Data’s mission is to provide a familiar and consistent, Spring-based programming model for data access while still retaining the special traits of the underlying data store.
It makes it easy to use data access technologies, relational and non-relational databases, map-reduce frameworks, and cloud-based data services.
This is an umbrella project which contains many subprojects that are specific to a given database.
The projects are developed by working together with many of the companies and developers that are behind these exciting technologies.
출처 Spring Data
위 글을 보면 데이터 액세스를 위해 친숙하고 일관된 Spring 기반 프로그래밍 모델을 제공하는 동시에 기본 데이터 저장소의 특수한 특성을 유지하는 목적으로 만들어진 프로젝트라는걸 알 수 있다.
Spring Data 하위에 다양한 프로젝트가 있으며 Spring Data JDBC, Spring Data JPA, Spring Data MongoDB 등이 포함된다.
그 중에서 우리는 Spring Data JPA에서 deleteById와 delete의 차이에 대해 알아보려 한다.
deleteById, delete ?
deleteById와 delete는 Spring Data의 API 중 CrudRepository interface에 정의되어 있다.

(전체적인 구조는 위 이미지와 같다)
Spring Data JPA에서의 구현부는 SimpleJpaRepository 이다.
Spring Data JPA에서는 deleteById 혹은 delete 메소드를 사용하여 DB에 delete 쿼리를 날릴 수 있다.
이는 위에서 말했듯 이미 구현이 되어있기 때문에 따로 구현을 해줄 필요 없이 아래와 같이 JpaRepository<T, ID> interface를 상속받은 Repository interface를 생성해줌으로써 사용이 가능하다.
public interface UserRepository extends JpaRepository<User, Long> {
}
deleteById와 delete를 활용한 삭제 로직
삭제에 대한 서비스 로직을 구현해보면 아래와 같이 구현할 수 있다.
@Service
public class UserService {

    private final UserRepository userRepository;

    public UserService(UserRepository userRepository) {
        this.userRepository = userRepository;
    }

    // (1) delete를 사용했을 경우
    public void delete(User user) {
        userRepository.delete(user);
    }

    // (2) deleteById를 사용했을 경우
    public void deleteById(Long userId) {
        userRepository.deleteById(userId);
    }

}
데이터를 삭제할 때 (1), (2) 두 가지 방식으로 구현이 가능한데 물론 결과는 동일하다.
그렇다면 둘의 차이는 뭐가 있을까?
직접 deleteById와 delete의 구현부분을 확인해봤다.
SimpleJpaRepository에서 차이점 확인
deleteById

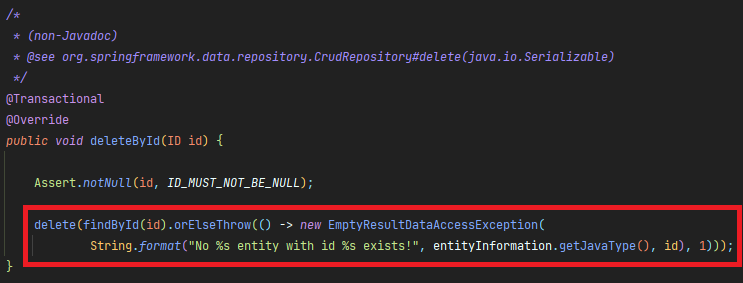
deleteById 코드를 하나씩 살펴보면 아래와 같은 내용이 구현되어있다.
- deleteById 내부적으로 delete를 호출하고있다.
- 넘어온 id값으로 findById를 사용하여 delete에 인자로 넘겨줄 데이터를 조회하고있다.
- 넘어온 id 값이 null 인 경우는 EmptyResultDataAccessException 을 발생시키고 있다.
delete

delete 코드는 위 이미지에 보이는대로 넘어온 entity에 대해 null체크를 한 후 EntityManager를 통해 삭제를 진행하고있다.
deleteById와 delete의 차이점을 비교하는게 주된 목적이기 때문에 실제 삭제는 어떤 과정을 통해 진행하는지는 이 포스트에서는 분석하지 않고 넘어가도록 하겠다.
두 메소드의 구현부를 분석해본 결과 deleteById와 delete는 완전 다른게 아니라 최종적으로는 delete를 호출하여 삭제를 하는걸 확인 할 수 있었다.
그렇다면 deleteById와 delete는 왜 나눠져 있을까?
둘의 차이는 delete보다는 findById 쪽에 있다.
위 deleteById와 delete를 활용한 삭제 로직 에서 본 삭제 로직 중 delete 메소드는 사실 위에서 작성한 코드보다 아래 처럼 findById와 조합해서 쓰는 경우가 많다.
public void delete(Long userId) {
    userRepository.delete(
            userRepository.findById(userId).orElseThrow(() -> new UserNotFoundException(User.class, userId))
    );
}
or
public void delete(Long userId) {
    userRepository.findById
        .map(user -> userRepository.delete(user))
        .orElseThrow(() -> new UserNotFoundException(User.class, userId));
}
이렇게 직접 findById와 delete를 조합해서 사용하는 방법과 deleteById 하나를 사용하는 방법으로 나눠진다고 볼 수 있다.
deleteById의 장점은?
deleteById를 사용하면 서비스 로직에서 메소드를 하나만 사용해도 조회와 삭제가 다 된다는 장점이있다.
또한 내부적으로 id에 대한 null 체크를 해주기 때문에 서비스 로직에서 id의 null 체크를 하지 않았더라도 의도치 않은 NullPointerException 발생을 예방할 수 있다.
그럼 findById 와 delete를 조합하는 장점은 뭐가 있을까?
위에서 설명했듯 deleteById를 사용하면 내부적인 findById 조회 시 값이 없을 경우 EmptyResultDataAccessException 이 발생한다.
에러 메시지도 String.format("No %s entity with id %s exists!", entityInformation.getJavaType(), id) 로 고정이다.
하지만 findById를 직접 사용하면 예외처리를 커스텀하여 서버 개발자가 원하는 메시지를 클라이언트로 보내줄 수 있다는 장점이 있다.
마치며...
deleteById와 delete를 비교해보게 된건 똑같은 기능을 하는 둘의 성능차이가 있나 궁금했던게 시작이였다.
내부 코드를 들여다보니 실직적으로는 id로 조회 시 null에 대한 Exception 처리에 대한 차이만 있고 전체적으로 결국 동일한 로직이라 성능상에는 큰 차이가 없어서 보인다.
사실 성능에 차이가 있을만큼 차이점이 있었다면 좀 더 만족스러운 분석이였을 것 같지만 그래도 deleteById vs delete를 검색했을 때 위 내용을 제대로 분석해둔 글이 간단히 설명되어 있는 stack overflow 말고는 없는 것 같아 정리해 보았다.
deleteById와 delete는 각각의 특징이 있으니 상황에 잘 맞춰 사용해야 할 것 같다.
댓글